mercredi 4 mars 2015

Why i have chosen blogger

It is ease to use. At first Blogger is very simple but it also could be customizable. If you need you could get access to the html source code.

It is distraction less. Blogger is a very simple blogging tool. I think you will be more productive and focus about the content. You would not waste time about admin stuff on your blog platform or hosting server.

It is free. As many Google service, blogger is also free. Now I would not have to pay for the blog hosting. Blogger provides a pretty fast and reliable website without ad. But I choose to add some with Google AdSense...
I know that some people will say: it is from Google, so you are the product, they can close your site and bla bla bla... I am perfectly aware of that. I am in IT field, but for the reason's before I choose this platform. I know that is could not fit for everyone and may have some limitations even for me but I do not want to build something from scratch ! I will care about the content.

mercredi 18 février 2015

2 reasons: Why i am blogging

Keeping notes and thoughts. My blogger will be like my moleskine's notebook. I will keep a trace about my experiences and share them with peoples.

Improve my English. As a French, I am knowned to not be good at English. Blogging could be the perfect way to improve my writing skill's in English. By the way feel free to told me my mistakes.

My new year resolution just do it instead of talking. I always blog but I was not really focused. So now I will be a real blogger !

mercredi 1 mai 2013

SNES USB Gamepad with Raspberrypi

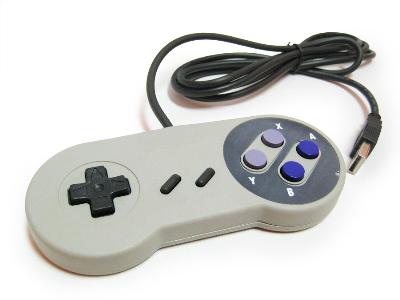
Last week-end I setup RetroPie with 2 SNES USB gamepad bought on eBay.

I would like to share my gamepad mapping.

HTH


Add these lines at the bottom of the retroarch.cfg
vi /home/pi/RetroPie/configs/all/retroarch.cf

Exit current game and go back to emulator menu with these two lines
input_enable_hotkey_btn = "9"
input_exit_emulator_btn = "8"
Mapping for 2 SNES gamepad

 input_player1_joypad_index = "0"
input_player1_a_btn = "1"
input_player1_b_btn = "2"
input_player1_x_btn = "0"
input_player1_y_btn = "3"
input_player1_l_btn = "4"
input_player1_r_btn = "5"
input_player1_start_btn = "9"
input_player1_select_btn = "8"
input_player1_left_axis = "-0"
input_player1_up_axis = "-1"
input_player1_right_axis = "+0"
input_player1_down_axis = "+1"

input_player2_joypad_index = "1"
input_player2_a_btn = "1"
input_player2_b_btn = "2"
input_player2_x_btn = "0"
input_player2_y_btn = "3"
input_player2_l_btn = "4"
input_player2_r_btn = "5"
input_player2_start_btn = "9"
input_player2_select_btn = "8"
input_player2_left_axis = "-0"
input_player2_up_axis = "-1"
input_player2_right_axis = "+0"
input_player2_down_axis = "+1"


mercredi 24 octobre 2012

Quand il ne fait pas bon d'être un late adopter

On utilise l'expression d'early adopter pour parler du premier parmi un groupe qui adopte un produit. J'en fais partis lorsqu'il y a une innovation de rupture c'est à dire tous les 36 du mois et que mon compte en banque le permet...

Pour le coup, je suis plutôt un late adopter. J'adopte le produit seulement lorsqu'il a fait ses preuves, qu'il est stable, peut-être délaissé du grand public et surtout moins cher!

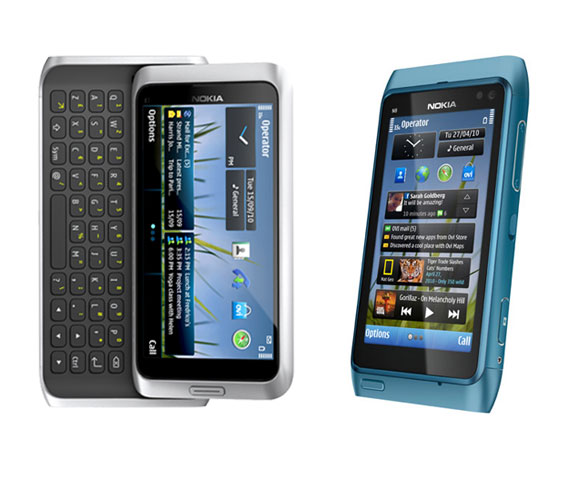
Voila mon histoire, j'ai acheté 2 Smartphones Nokia E7 & N8. Ils sont à mon goûts encore inégalés, l'un avec un clavier complet et le second avec un appareil photo toujours d'actualité!


Génial me direz-vous, mais où est donc le problème !?
Il se trouve au niveau de la carte SIM, vous savez cette petite puce que l'on manipule bien peu souvent!
Je soupçonne ma carte SIM de faire redémarrer le téléphone de manière aléatoire... Je vais chez mon opérateur d'un nom d'agrume pour faire changer la dite puce. Je préviens le conseiller que je possède un Nokia et que j'ai vu passer sur la toile des utilisateurs de Sosh qui décrivaient les problèmes liés à la nouvelle carte SIM N8 NFC. Il me répond vous savez sur internet...
Ok je procède au changement et là c'est le drame, plus de GPS, Ovi Store...

Le problème va être réglé dans 72h soit dès la réception de ma nouvelle ancienne carte SIM NFC N7.

Je ne comprends pas le processus d'information interne dans cette multinationale, comment ça se fait que pour ce problème n'est toujours pas remonté dans toutes les agences et ceux depuis presque un an!

Je suis pas naïf, je sais que les dernière cartes SIM sont distribués pour les derniers téléphones, cela ne touche pas les nouveaux utilisateurs mais uniquement les possesseurs d'anciens mobiles (2ans!).


dimanche 3 juin 2012

Setup 20*4 SureElectronics LCDProc


You could setup step by step the 20*4 SureElec. LCD with my memo :o)

Download and extract the archive.
wget http://lcdproc.cvs.sourceforge.net/viewvc/lcdproc/lcdproc/?view=tar
Now we will build the driver.


aptitude install libusb-dev autogen automake
sh ./autogen.sh
./configure –enable-drivers=SureElec
make
make install
nano /usr/local/etc/LCDd.conf

 Then you could copy my LCDd.conf
# LCDd.conf -- configuration file for the LCDproc server daemon LCDd
 ## Server section with all kinds of settings for the LCDd server ##
[server]
Driver=SureElec
# Tells the driver to bind to the given interface
Bind=127.0.0.1
# Listen on this specified port; defaults to 13666.
Port=13666
# Sets the reporting level; defaults to 2 (warnings and errors only).
#ReportLevel=3
# Should we report to syslog instead of stderr ? Default: no
#ReportToSyslog=yes
# Sets the default time in seconds to displays a screen.
WaitTime=5
# User to run as.  LCDd will drop its root priviledges,
# if any, and run as this user instead.
User=root
# If yes, the the serverscreen will be rotated as a usual info screen. If no,
# it will be a background screen, only visible when no other screens are
# active.
#ServerScreen=no
# The server will stay in the foreground if set to true.
#Foreground=no
# Where can we find the driver modules ?
DriverPath=/usr/local/lib/lcdproc/
# GoodBye message: each entry represents a display line; default: builtin
#GoodBye="Thanks for using"
#GoodBye="   LCDproc!"
# The "...Key=" lines define what the server does with keypresses that
# don't go to any client.
# These are the defaults:
ToggleRotateKey=Enter
PrevScreenKey=Left
NextScreenKey=Right
#ScrollUpKey=Up
#ScrollDownKey=Down
# If you have only 4 keys, you can choose to use this:
#ToggleRotateKey=Enter
#PrevScreenKey=Up
#NextScreenKey=Down
# If you have only 3 keys, you can choose to use this:
#ToggleRotateKey=Enter
#PrevScreenKey=Up

## The menu section. The menu is an internal LCDproc client. ##
[menu]
# You can configure what keys the menu should use. Note that the MenuKey
# will be reserved exclusively, the others work in shared mode.
# The following works excellent with 4 keys or more.
MenuKey=Escape
EnterKey=Enter
UpKey=Up
DownKey=Down
# If you have 6 keys you may define these as well
#LeftKey=Left
#RightKey=Right
# If you have only 3 keys, you could use something like this:
#MenuKey=Escape
#EnterKey=Enter
#DownKey=Down

### Driver sections are below this line, in alphabetical order  ###
##Sure
[SureElec]
Device =/dev/ttyUSB0
Edition=2
Contrast=480
Brightness=480

You could start LCDd and you should get a get a Clients: 0 and Screens: 0 on the LCD Screen.
Set parameters in lcdproc.conf file then launch lcdproc.

lundi 2 avril 2012

Installer openwrt sur le TL-WR703N et piratebox


1- Dans un premier temps téléchargez le firmware ici

2- Reliez votre ordinateur par cable RJ45 ou connectez-vous en wifi directement au TP.

4- Ouvrez la page  http://192.168.1.1 avec un navigateur web.

Je vous rappel que le login et le password est admin.

5- Même si tout est écris en chinois pas de panique !
Dans le menu allez à la derniere section et selectionnez la 3e option.
Vous Pourrez uploader le firmware téléchargé dans l'étape 1.

6- Reboot du TP sous openwrt.
Connectez-vous en Telnet à l'adresse 192.168.1.1

7- Définissez un mot de passe pour root avec passwd.

8- Editez le fichier /etc/config/network avec vi
vi /etc/config/network

Inspirez-vous du miens pour faire cohabiter le TP avec votre réseau local

config interface ‘loopback’
option ifname ‘lo’
option proto ‘static’
option ipaddr ’127.0.0.1'
option netmask ’255.0.0.0'
config interface ‘lan’
option ifname ‘eth0'
option type ‘bridge’
option proto ‘static’
option ipaddr ‘adresse ip libre sur le réseau‘
option netmask ’255.255.255.0'
option gateway ‘l'adresse ip de votre routeur‘
list dns ‘ l'adresse ip de votre routeur ‘ // DNS principal
list dns ’8.8.8.8' //DNS secondaire (google)

9- On modifie la configuration du fichier du firewall /etc/config/firewall

config defaults
option syn_flood ’1'
option input ‘ACCEPT’
option output ‘ACCEPT’
option forward ‘ACCEPT’
# Uncomment this line to disable ipv6 rules
# option disable_ipv6 1
config zone
option name ‘lan’
option network ‘lan’
option input ‘ACCEPT’
option output ‘ACCEPT’
option forward ‘ACCEPT’
config zone
option name ‘wan’
option network ‘wan’
option input ‘ACCEPT’
option output ‘ACCEPT’
option forward ‘ACCEPT’
option masq ’1'
option mtu_fix ’1'

10- On active le wifi du routeur dans le fichier /etc/config/wireless
il faut que la ligne option disabled soit à 0

11- On reboot le TP avec la commande reboot.

12- On accède au TP avec la nouvelle adresse IP.
On test la connexion internet avec un ping: ping google.com -c 3

13- Installez le support USB au kernel d'openwrt


opkg update
opkg install kmod-usb-uhci
insmod usbcore
insmod uhci
opkg install kmod-usb-ohci
insmod usb-ohci

Connectez votre clé usb FAT32 et vérifiez qu'elle est bien reconnue avec la commande dmesg

A ce stade on peut installer Piratebox

14- Lancez l'installation de PirateBox et patientez !


cd /tmp
wget http://piratebox.aod-rpg.de/piratebox_0.3-2_all.ipk
opkg update && opkg install piratebox*

15- Connectez-vous et partagez !

Vous pouvez personnalisez le SSID de votre PirateBox en rééditant le fichier  /etc/config/wireless


lundi 5 mars 2012

Proxy Socks over SSH

It is an useful command that let you secure a web connection thanks to an SSH tunnel.

ssh -D 2000 sam@serveur.fr - p 22

-D specify the local port
-p specify the port from your ssh server

Now you just have to setup your Internet browser.